Step 2: Define the layer stack |
  
|
Step 2: Define the layer stack |
|
This step of defining the geometric structure of the sample will be done quickly because we assume the most simple layer stack that is possible: The infrared radiation that probes the sample travels through vacuum and hits a vacuum-silicon interface. The spectrometer records the fraction of radiation that is reflected from this single interface. We neglect any radiation that is reflected from the backside of the sample which is often a good approximation (either the radiation passing through the silicon wafer is absorbed or scattered away at the rough backside).
Of course, there are also cases where the backside reflections have to be taken into account. In such a case optical modeling is much harder because with backside reflections you see many contributions from weak multiphonon and impurity absorption processes in silicon.These excitations can be successfully handled as well but for this first example in the first tutorial we stick to the simple case of 'halfspace reflectance' with no backside effects.
To start the practical part, open the treeview branch Layer stacks by a right-click. This will open the list of layer stacks:
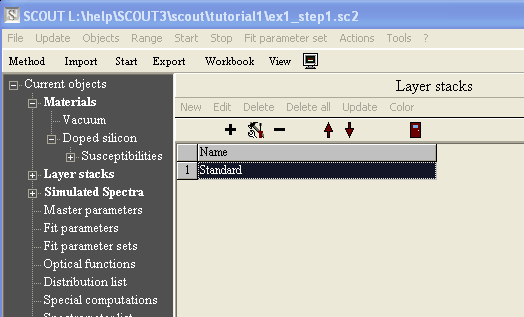
SCOUT can work with several layer stacks at a time which are managed in this list. For the present case we need only one layer stack, so we can use the already existing layer stack named 'Standard'. Click the + to the left of the treeview branch Layer stacks and right-click the branch Standard which has shown up:

The center of the Standard subwindow to the right represents the layer structure of the sample:
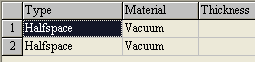
You see, there are just two adjacent vacuum halfspaces. The light is incident from the top halfspace. Any thin films or thick layers would be in between the two 'halfspaces' but since we don't have to take into account any layers in this problem we have just to replace the vacuum in the bottom halfspace by silicon. We can to the assignment of materials to layers in a layer stack by a drag&drop operation.
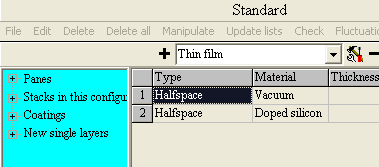
Here is what you have to do: Open in the treeview the branch which represents the wanted material. Keep this branch visible in the treeview. Then display the layer stack by a right-click on the Standard tree branch. Start a drag operation at the material item in the treeview (i.e. press the left mouse button down and keep it down while you move the mouse) and drop it at the bottom halfspace of the 'Standard' layer stack as indicated by the red arrow below (release the mouse button at the wanted position):

Check that the wanted material appears in the 'Material' column of the layer. After this operation, the layer stack should be the following:
Now the sample's layer structure is defined and you can proceed with the next step.