Routine work |
  
|
Routine work |
|
Here is the sequence of commands for a simple routine case with spectrum import, analysis and export of the results.
Spectrum import
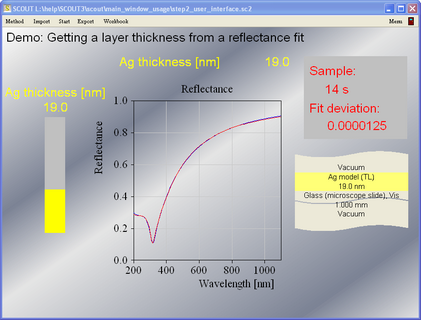
Use the Import command to load new spectra. First the user is asked to enter a short text charcterizing the sample. This text will replace the text '10 s' which is shown in the upper right rectangle underneath 'Sample:'.
Type in '14 s' and then select the file ag_14.std (SCOUT standard format) that comes with tutorial 1. Make sure the spectral unit in the following range dialog is set to nm:

The SCOUT window should now have changed to this:

Doing the analysis
You can change the silver thickness value in the optical model by moving the height of the yellow bar on the left with the mouse. In this simple example it is very easy to find a good solution just be manually trying different values.
You can also press the Start button to tell SCOUT to do the analysis. The progress of the fit is indicated by the number given underneath the label 'Fit deviation'. This number describes the average difference between model spectrum and measurement - it should be as small as possible. While the fit is running, the Start button becomes a Stop button. Use this button to interrupt the fit, freezing the current best parameter values. When the fit stops the Stop button turns into a Start button again. The fit result for sample '14 s' is this:
Write the results to the Workbook
Apply the Export command to write the obtained parameter values for this sample to the workbook. The values of all defined optical functions are written to the workbook as well. If this is the first time you write to the workbook, SCOUT will erase the workbook page for the results and create a new one. It will ask you for the permission to do so:

Having answered 'Yes', you can now go back to the import step and analyze as many spectra as you like, exporting for each one the results to the workbook.
Saving the results
Once you have processed all samples, you have to save the results that are listed in the workbook. In order to do so, open the workbook with the Workbook command:

If you like you can use the Autosize cells command to adjust the size of the cells automatically:

The workbook has file commands to save its content in various formats, including text files and Excel 5 format. You can also select a range of cells or the whole sheet and use the Copy command to copy the cell content into the clipboard (for a subsequent paste action into Excel, for example).