Main window overview |
  
|
Main window overview |
|
This section explains how you work with the main window. It is assumed that a working optical model exists and the main window has been configured in a user-friendly way. Since there is a large variation of possible designs we cannot cover all variations of the main window appearance. The following example shows a typical case covering the most important features.
The example used here is a simple thickness determination. The task is to get the thickness of a sputtered silver layer on microscope slide glass from a measured reflectance spectrum in the spectral range 200 ... 1100 nm. This configuration has been made in the previous 'Quick start' section. The main window looks like this:
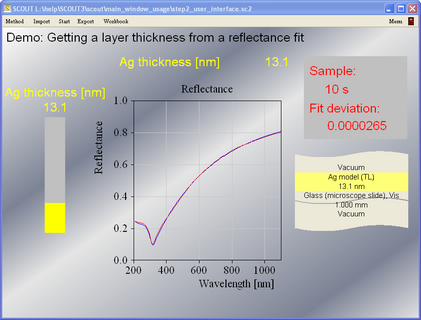
The task of this configuration is to provide a user-interface for importing spectra, do the analysis, and export the results. In the ideal case of a well-defined and tested configuration the user has to handle only a small number of commands in routine work.
Sometimes the graphical settings are not appropriate and the user may want to change it. How this is done is explained in a separate section.
A little more advanced is the combination of the main window and the batch control window. This is also explained separately.